| Home · All Classes · Main Classes · Grouped Classes · Modules · Functions |
[Previous: Chapter 5] [Qt Tutorial] [Next: Chapter 7]
Files:
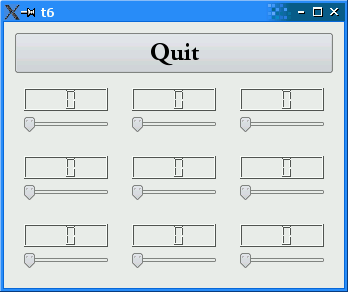
This example shows how to encapsulate two widgets into a new component and how easy it is to use many widgets. For the first time, we use a custom widget as a child widget.
    #include <QApplication>
    #include <QFont>
    #include <QGridLayout>
    #include <QLCDNumber>
    #include <QPushButton>
    #include <QSlider>
    #include <QVBoxLayout>
    #include <QWidget>

    class LCDRange : public QWidget
    {
    public:
        LCDRange(QWidget *parent = 0);
    };

    LCDRange::LCDRange(QWidget *parent)
        : QWidget(parent)
    {
        QLCDNumber *lcd = new QLCDNumber(2);
        lcd->setSegmentStyle(QLCDNumber::Filled);

        QSlider *slider = new QSlider(Qt::Horizontal);
        slider->setRange(0, 99);
        slider->setValue(0);
        connect(slider, SIGNAL(valueChanged(int)),
                lcd, SLOT(display(int)));

        QVBoxLayout *layout = new QVBoxLayout;
        layout->addWidget(lcd);
        layout->addWidget(slider);
        setLayout(layout);
    }

    class MyWidget : public QWidget
    {
    public:
        MyWidget(QWidget *parent = 0);
    };

    MyWidget::MyWidget(QWidget *parent)
        : QWidget(parent)
    {
        QPushButton *quit = new QPushButton(tr("Quit"));
        quit->setFont(QFont("Times", 18, QFont::Bold));
        connect(quit, SIGNAL(clicked()), qApp, SLOT(quit()));

        QGridLayout *grid = new QGridLayout;
        for (int row = 0; row < 3; ++row) {
            for (int column = 0; column < 3; ++column) {
                LCDRange *lcdRange = new LCDRange;
                grid->addWidget(lcdRange, row, column);
            }
        }

        QVBoxLayout *layout = new QVBoxLayout;
        layout->addWidget(quit);
        layout->addLayout(grid);
        setLayout(layout);
    }

    int main(int argc, char *argv[])
    {
        QApplication app(argc, argv);
        MyWidget widget;
        widget.show();
        return app.exec();
    }
    class LCDRange : public QWidget
    {
    public:
        LCDRange(QWidget *parent = 0);
    };
The LCDRange widget is a widget without any API. It just has a constructor. This sort of widget is not very useful, so we'll add some API later.
    LCDRange::LCDRange(QWidget *parent)
        : QWidget(parent)
    {
        QLCDNumber *lcd = new QLCDNumber(2);
        lcd->setSegmentStyle(QLCDNumber::Filled);

        QSlider *slider = new QSlider(Qt::Horizontal);
        slider->setRange(0, 99);
        slider->setValue(0);
        connect(slider, SIGNAL(valueChanged(int)),
                lcd, SLOT(display(int)));

        QVBoxLayout *layout = new QVBoxLayout;
        layout->addWidget(lcd);
        layout->addWidget(slider);
        setLayout(layout);
    }
This is lifted straight from the MyWidget constructor in Chapter 5. The only differences are that the Quit button is left out and the class is renamed.
    class MyWidget : public QWidget
    {
    public:
        MyWidget(QWidget *parent = 0);
    };
MyWidget, too, contains no API except a constructor.
    MyWidget::MyWidget(QWidget *parent)
        : QWidget(parent)
    {
        QPushButton *quit = new QPushButton(tr("Quit"));
        quit->setFont(QFont("Times", 18, QFont::Bold));
        connect(quit, SIGNAL(clicked()), qApp, SLOT(quit()));
The push button that used to be in what is now LCDRange has been separated so that we can have one Quit button and many LCDRange objects.
QGridLayout *grid = new QGridLayout;
We create a QWidget with a QGridLayout that will contain three columns. The QGridLayout automatically arranges its widgets in rows and columns; you can specify the row and column numbers when adding widgets to the layout, and QGridLayout will fit them into the grid.
        for (int row = 0; row < 3; ++row) {
            for (int column = 0; column < 3; ++column) {
                LCDRange *lcdRange = new LCDRange;
                grid->addWidget(lcdRange, row, column);
            }
        }
We create nine LCDRange widgets, all of which are children of the grid object, and we arrange them in three rows and three columns.
}
That's all.
This program shows how easy it is to use many widgets at a time. Each one behaves like the slider and LCD number in the previous chapter. Again, the difference lies in the implementation.
Initialize each slider with a different/random value on startup.
[Previous: Chapter 5] [Qt Tutorial] [Next: Chapter 7]
| Copyright © 2006 Trolltech | Trademarks | Qt 4.1.3 |